

SQ-1
STEP SEQUENCER
¿Dónde comprar?
Soporte
Saber mas
Productos relacionados


Accesorios

FAQ
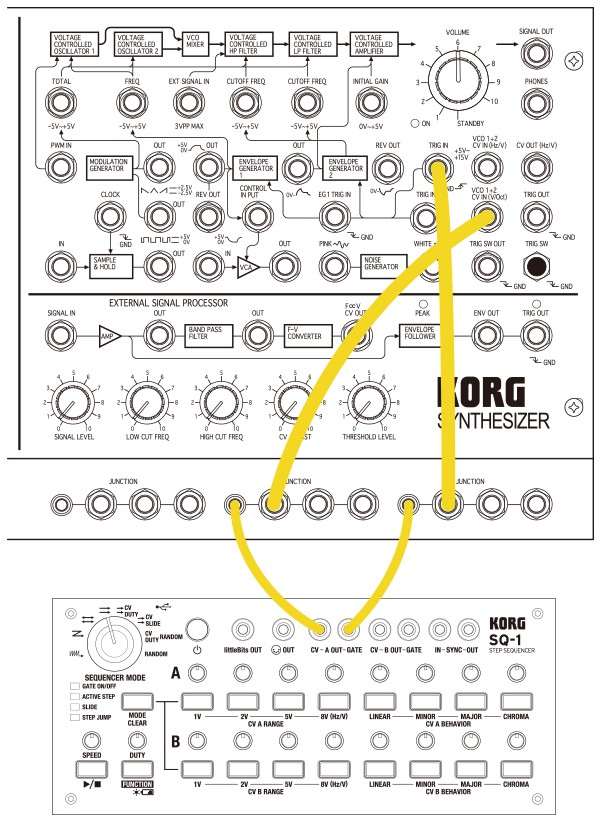
(Click to enlarge)
A:
1) Use the 1/8" patch cables and 1/4" patch cables included with the MS-20M to connect the SQ-1 and the MS-20M as shown in the illustration to the right:
• SQ-1's CV-A OUT jack -> MS-20M's JUNCTION jack -> VCO 1+2 CV IN (V/Oct) jack
• SQ-1's CV-A GATE jack -> MS-20M's JUNCTION jack -> TRIG IN +5V~+15V jack
The MS-20M has two types of TRIG IN jacks, when connecting with the SQ1 you should connect the TRIG IN +5V~+15V jack as when using the SQ-1's factory settings.
2) 2) Set the SQ-1's CV A RANGE setting to 5V. This widens the pitch range you can adjust using the SQ-1's knobs:
• While holding down the SQ-1's FUNCTION button, press the 5V button for the CV A RANGE setting of channel A, making the button light.
3) 3) Press the SQ-1's START/STOP button to trigger the MS-20M.
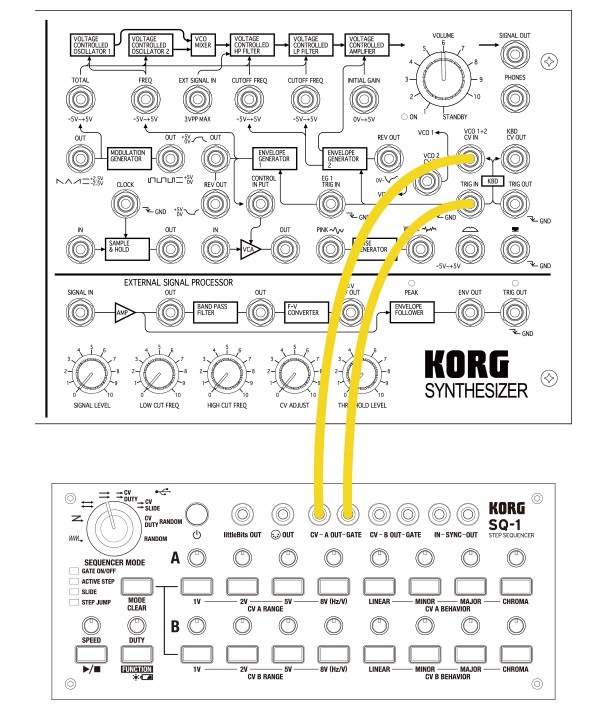
(Click to enlarge)
A:
1) Use the 1/8" patch cables included with the MS-20 mini, or the separately sold MS-CABLE-18 option, to connect the SQ-1 and the MS-20 mini as shown in the illustration to the right:
• SQ-1's CV-A OUT jack -> MS-20 mini's VCO 1+2 CV IN jack
• SQ-1's GATE-A OUT jack -> MS-20 mini's TRIG IN jack
2) Set the SQ-1's CV A RANGE setting to 8V (Hz/V):
• While holding down the SQ-1's FUNCTION button, press the 8V (Hz/V) button of the CV A RANGE setting for channel A, making the button light.
3) Set the SQ-1's GATE OUT polarity from positive (factory preset) to “-” (negative).
• While holding down the SQ-1's START/STOP button, turn the power on (the unit starts up in global parameter setting mode).
• Press the SQ-1's MODE/CLEAR button to make the button go dark. (This alternates between un-lit and lit each time you press the button: “-” when un-lit, “+” when lit.)
• Press the SQ-1's power button to save the setting (*).
4) Press the SQ-1's START/STOP button to trigger MS-20 mini.
* In this global parameter setting mode, you can use the SEQUENCER MODE selector to set the sequencer's step resolution. When you save the GATE OUT polarity as described above, the step resolution setting specified by the selector position is also saved at the same time, so if you don't want to change the resolution, set the selector to the CV/DUTY RANDOM or RANDOM position so that only the GATE OUT polarity setting is saved.
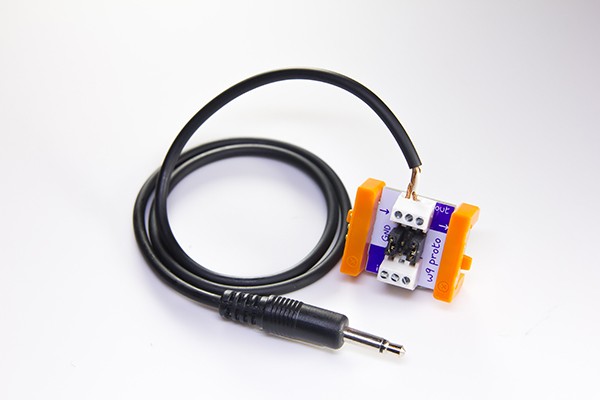
the littleBits Proto module and a mini-monaural cable
Example
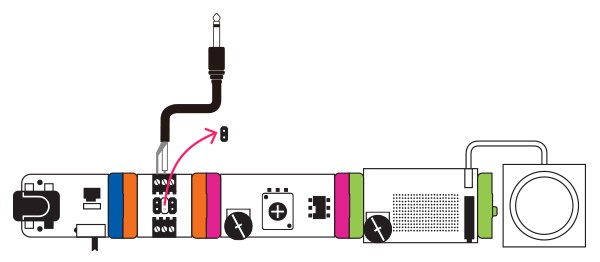
A. To connect the SQ-1's littleBits OUT jack with the littleBits Synth Kit, you'll need the littleBits Proto module and a mini-monaural cable (*).
1) Strip some insulation from the mini-monaural cable.
2) As shown in the illustration to the right, fasten the core and shield of the cable to the terminal screw of the Proto module.
3) Of the Proto module's three jumpers, remove the middle jumper.
4) Set up the littleBits circuit (one example is shown to the right), and connect the Proto module's mini-monaural cable to the SQ-1's littleBits OUT jack.
5) Press the SQ-1's START/STOP button to make the littleBits Synth Kit start playing.
* A mini-stereo cable can also be used, but in this case, do not connect the ring to the Proto module.
Troubleshooting
A. If the TRIG IN polarity of the MS-20 / MS-20 mini does not match the GATE OUT polarity of the SQ-1, the gate output's on/off operation is inverted, so notes won't stop. Change the SQ-1's GATE OUT polarity as described above in step 3) of “Q. How do I connect the SQ-1 for use with the MS-20 mini.”
A: It depends on the model of analog synthesizer that's connected. The MS-20 / MS-20 mini support “-” (negative). The MS-20M provides both a “-” (negative) TRIG IN jack and a “+” (positive) TRIG IN +5V~+15V jack. Since littleBits has a dedicated littleBits OUT jack, it works correctly regardless of the polarity setting.
Broadly speaking, there are two CV standards used by analog synthesizers.
• Hz/V: Frequency and voltage correspond; doubling the voltage produces a one-octave rise in pitch.
• V/Oct: Frequency is specified by one octave corresponding to one volt.
Since these two methods differ completely in both the range of change and the type of change produced by change in the CV voltage, you can't play correct pitches if the synthesizer's CV IN uses a different standard than the SQ-1's CV OUT setting. If the SQ-1's CV RANGE is set to 1V, 2V, or 5V, it uses the V/Oct standard. If the CV RANGE is set to 8V, it uses the Hz/V standard. Change the SQ-1's CV RANGE setting as described above in step 2) of “How do I connect the SQ-1 for use with the MS-20M” or step 2) of “How do I connect the SQ-1 for use with the MS-20 mini.”
Major models using each CV standard are listed below.
・Hz/V models:KORG MS-20 series (*), YAMAHA CS series, etc.
・V/Oct models:ARP ODYSSEY, MOOG Minimoog, etc.
* Only the MS-20M also provides a VCO1+2 CV IN (V/Oct) jack that supports V/Oct.
A. With the V/Oct standard, one volt corresponds to one octave; however with the Hz/V standard, doubling the voltage produces a one-octave rise.
This means that:
• 1V-2V: First octave
• 2V-4V: Second octave
• 4V-8V: Third octave
Therefore, a voltage of 8V is needed to express three octaves.
A. In global parameter setting mode, you can use the 16 step buttons to specify the channel A MIDI channel (1--16), but the channel B MIDI channel is always assigned as one higher than the channel A MIDI channel. For example if the channel A MIDI channel is 1, the channel B MIDI channel is 2. If the channel A MIDI channel is 16, the channel B MIDI channel is 1.
Although analog CV voltage can produce linear change, pitch control via MIDI is in semitone steps. This means that even if CV BEHAVIOR is set to LINEAR, the MIDI OUT operates the same as the CHROMA setting. If you are connecting an analog synthesizer via MIDI, try connecting it via CV.
It is possible to smoothly move between two pitches when using analog CV voltage. However, when using MIDI control, pitches are in semitone units. This means that the SLIDE parameter is not used for MIDI OUT. If you are connecting an analog synthesizer via MIDI, try connecting it via CV.
A. They are as follows:
・CV A RANGE:1V
・CV B RANGE:1V
・CV A BEHAVIOR:LINEAR
・CV B BEHAVIOR:LINEAR
・MIDI channel: 1 (channel B MIDI channel is 2)
・Step resolution:8th note / SYNC X2
・GATE OUT polarity:+ (positive)
・SYNC IN/OUT polarity:+ (rise)
・Auto power-off:enabled
The SQ-1 lets you change the sequencer's step resolution. If the step resolution does not match the device that is connected via SYNC, the sequencers will not play in synchronization. In global parameter setting mode, adjust the position of the SEQUENCER MODE selector to the appropriate step resolution as follows.
- "WW" ALTERNATE
- quarter note
- SYNC x2
- "Z" ORDER
- 8th note
- SYNC x2
- “<=>“ PARALLEL TURN
- 16th note
- SYNC x2
- "=>" PARALLEL ORDER
- quarter note
- SYNC x1
- "=>" CV DUTY
- 8th note
- SYNC x1
- "=>" CV SLIDE
- 16th note
- SYNC x1
- CV/DUTY | RANDOM
- unavailable
- unavailable
- RANDOM
- unavailable
- unavailable
| * SYNC X2 = 1 sync clock advances 2 steps / SYNC x1 = 1 sync clock advances 1 step |
Tips
When adjusting the pitch for each step of the sequencer, it is time-consuming to make adjustments while the sequencer is running. In such cases, the STEP JUMP function is helpful. Since this function is available even when the sequencer is stopped, you can press the button of the step for the pitch you want to adjust, causing the pitch of that step to sound as long as you hold down the button. (The GATE opens, and the CV voltage of the pitch specified for that step is output.) In this STEP JUMP state, you can turn a knob while holding down the button of the step you want to adjust, and quickly adjust the pitch of the appropriate step.
You can use MIDI OUT (including USB-MIDI) or SYNC OUT to synchronize a MIDI device, volca, or electribe to the SQ-1. SYNC OUT lets you synchronize the tempo of a monotribe, volca, or electribe. By connecting an external MIDI device to MIDI OUT, you can also control the sequencer's start/stop as well as tempo synchronization.
To synchronize the SQ-1 to an external device, you can use either of two methods: USB-MIDI connection or SYNC IN connection. USB-MIDI connection allows sequencer start/stop and tempo synchronization. SYNC IN connection allows only tempo synchronization. If USB-MIDI and SYNC IN are both connected, SYNC IN takes priority as the synchronization clock. However, the SYNC IN signal is a clock only for tempo synchronization. Since SYNC IN does not provide sequencer start/stop functionality, start/stop operations performed on the SQ-1 itself or via USB-MIDI are valid even when the SQ-1 is synchronized via SYNC IN.
When the SQ-1 receives a note message via USB MIDI, it outputs the corresponding CV and GATE, allowing you to use the SQ-1 as a MIDI-CV converter. However, if the SQ-1 itself is outputting a CV, such as while the sequencer is running, that operation takes priority, and MIDI-CV conversion is not performed.
SQ-1
STEP SEQUENCER
Productos relacionados
Accesorios
Copyright © 2026 KORG Inc. Todos los derechos reservados
Elija su país ![]()