

Tutorials
1. How to customize a style bank
First of all, you'll unprotect the Factory data in memory.
- Go to Disk > Preferences, and uncheck the Factory Style and Pad Protect checkbox.
Then, you will make a backup of you memory data. Instead of using the Backup Resource procedure, you'll create a new SET folder, containing ordinary data to be later loaded one by one (and not a backup archive).
- Go to the Disk > Save page.
- Select the ALL folder, and press Open.
- Select the STYLE folder, then press Open to access the banks. Each bank corresponds to one of the buttons of the STYLE section. For example, BANK01.STY is the first button, when the upper row of names is selected.
- Select the first bank, then press Save To.
- In the new window that appears, choose a location into your hard disk, then press New SET, to create a SET folder where to save your data. Assign a name to the new folder (for example, MyBackup.set), then confirm.
- Press Save to save the selected bank, then confirm it being saved into the new SET folder (ex., MyBackup.set).
- Repeat the above for all the other banks.
At this point, you'll start loading data from the saved backup, to create you custom banks in memory.
- Go to the Disk > Load page.
- Select the backup folder (called, in the example above, MyBackup.set) and press Open.
- Select the STYLE folder, then press Open to access the banks.
- Select the bank containing one of the Styles you want to load into a Factory location, and press Open to see the Styles it contains.
- Select the desired Style, and press Load. A dialog box appears, asking you to select one of the available locations in memory. Select the target location, and press OK to load the Style.
Now you can rename your Styles.
- With the Styles still unprotected, select the first Style to be renamed, and press RECORD. Choose the Record/Edit Current Style option.
- Choose the Page menu > Write Style command, and edit the Style name.
- Save the Style into the original location, proposed as default option.
2. Creating a new Drum Kit
Note: only for models including the sampling feature.
First, you must load all needed samples, and save them to the hard disk and internal memory. Then, you must assign the loaded samples to a Drum Kit.
- Go to Sampling mode.
- Load a sample (page menu > Load Sample). If needed, edit it.
- Write the sample (page menu > Write Sample). While in the Write Sample dialog box, assign it to a percussive family. Assign it a name.
- Repeat the above for the other samples.
- Exit from Sampling. You will go to the Sound mode.
At this point, samples have been saved into (1) a hidden PCM folder inside the hard disk (used by the Autoload at startup function) and (2) mirrored in the internal RAM memory. - While in Sound mode, select one of the "Empty" User DK locations. (You may also select an existing Factory DK, to start from existing data).
- Press MENU, and go to the Drum Kit page.
- Assign each of the newly loaded RAM samples to different zones of the keyboard. Please remember to select the RAM bank (instead of the ROM one) before selecting each of the samples, and that there are six velocity layers for each key.
- Write the Drum Kit (page menu > Write Sound).
At this point, as seen above, you have samples in (1) a hidden PCM folder inside the hard disk and (2) mirrored in the internal RAM memory. You also have the Drum Kit's header (i.e., the Drum Kit's name and pointers) in the internal SSD memory.
This means that if you turn the instrument off, then on again, samples are deleted from the (volatile) RAM memory, while the Drum Kit's header is still in the (non-volatile) SSD memory.
When you select the Drum Kit, if samples have not been reloaded into the internal RAM memory, it may not actually sound. Samples are automatically reloaded it the Disk > Preferences > PCM Autoload option was selected before turning the Pa1X on.
It it wasn't, you may load them by pressing the Disk > Preferences > Load PCM button.
To move your new DrumKit to a different Pa1X:
- Go to Disk > Save.
- Select the ALL folder, and press Save To.
- Create a new ".SET" folder, by pressing the New ".SET" button.
- When the Save dialog box appears, check the "User Sound & DK" and the "PCM" options, to save the DrumKit header and PCM samples into the new SET folder.
- Press OK, and select a target location.
The new DrumKit will be saved, together with its samples, into the newly created SET folder.
3. How to program a FX as Insert
We firstly highlight the difference between Master and Insert effects.
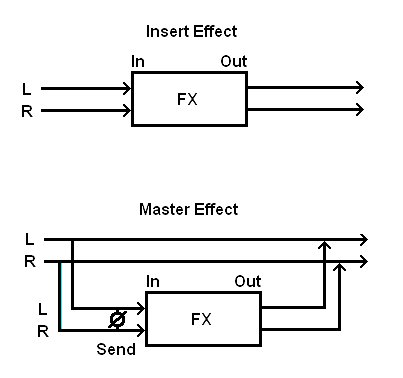
- the Insert effect breaks the signal between the input and the output of the track, meaning that the sound is fully processed. Popular insert effects include compressor, limiter, distortion, equalizer (EQ), chorus, flanger and rotary speaker simulators, although almost any effect is a candidate. Usually insert effects are used for individual tracks treatement.
- the Master effect mixes the full dry signal with a variable amount of wet signal and is mostly used to process multiple tracks togheter. The most commonly used master effects are ambience algorithms like reverb and delay.
The FX architecture of the Pa-Series is GM compliant and conceived so that you have up to four Master effects, but you can use FX 2 (Sound mode) or FX B and D (Style Play, Song Play and Sequencer modes) as Insert effects. Here is how to program them.
- Press the MENU button, and select the Effects section.
- Assign the Insert effect to the FX 2 (Sound mode) or FX B or D (all other modes) processor. Assign its input a "Send" value of 127. Set the "Wet/Dry" parameter to Wet. Uncheck the "Send to Master" option (Sound mode) or set the "Pan" to Off (Pa1X - Pa80) or uncheck the "Dry" parameter in the "Volume/Pan" tab (all other models).
- Set a value different than 0 for the "2 to 1", "B to A" or "D to C" parameter.
- Set the "Send" value for FX 1, A or C a value of 0, to avoid the dry signal enters the FX processor twice.
- Write the Sound, STS or Performance to memory.
4. SongBook Editor frequent operations
1. Merging two SongBook files
You can merge entries from different SongBook files.
- Run the SongBook Editor, and open the first SongBook file.
- Run a second session of the SongBook Editor, and open the second SongBook file.
- With the windows of both sessions on-screen, drag & drop entries from one window to the other one. You can drag&drop Songs between the Book and Selected List panels. When moving a Song from a source Selected List to a target one, the corresponding entry will be automatically created at the target Book panel. Note: When copying a Song to a different SongBook file, the Song's Song Selection Number is removed.
- Save the modified SongBook file(s).
2. Changing a Style’s position
Multiple entry editing allows for global replacement of resources. For example, say you moved a Style to a different location in your instrument; you can easily replace this Style in all entries making use of it. For example, if you moved the Style “Jazz Waltz” from location to location , here is how to edit your SongBook entries to reassign the Style:
- In the Book panel, click the Resource label to order all entries by Resource.
- Locate and select all entries referenced to Style , then double click one of them (or right-click and choose the Edit command) to open the Song dialog box for multiple entry editing.
- In the Song dialog box, check the “Style” checkbox, choose bank 10 and location 1, then click OK to close the dialog box.
- Notice how all selected entries are now referenced to Style .
3. Changing the device and path to your midifiles and MP3 files
In case you move your midifiles or MP3 files to a different device or folder, for example from your PC’s hard disk to an USB memory stick, or from the root to the “Midifile” folder, it is easy to reassign them to the new device or folder. When editing a single entry, you can edit both the file path and the file name. When editing multiple entries, you can only edit the file path.
- Select the entry(es) to be edited, right-click it (them) and choose the Edit command.
- When the (Multiple) MIDI Song or MP3 Song opens, locate the “Resource file” line (or check the “Resource path” checkbox, in case of multiple entries).
- Enter the new device or path. You can also click on the yellow folder icon to browse the new file in the connected devices. Storage devices, like hard disks and USB memory sticks, are represented by IDs, as in the following table:
| ID | Storage Device | |
|---|---|---|
| Pa1X Pro - Pa1X | B: | Floppy Disk |
| C: or [label](a) | Hard Disk | |
| D: | CD Drive | |
| Pa2X Pro - Pa800 | F2: or [label](a)(b) | Internal SSD-U memory |
| C: or [label](a)(b) | Internal Hard Disk | |
| [label] | Storage device connected to one of the | |
| USB Host ports. | ||
| Pa500 - Pa588 | E: or [label](a) | SD card |
(a). The label is the name you assigned to the storage device in the Disk/Media > Format page, prior to formatting it.
(b). Note: The [label] can be applied only starting from Pa800 OS 1.02.
Hint: If you keep most of your files in an USB memory stick, you can easily move the stick from your PC and your Pa2X-Pa800. In this case it may be a good idea to choose the USB stick as the device.
4. Changing the associated text file
In case you move your lyrics text files to a different device or folder, for example from your PC’s hard disk to an USB memory stick, or from the root to the “Lyrics” folder, it is easy to reassign them to the new device or folder.
- Select the entry(es) to be edited, right-click it (them) and choose the Edit command.
- When the (Multiple) MIDI Song or MP3 Song opens, locate the “Text file” line (or check the “Text file path” checkbox, in case of multiple entries).
- Enter the new device or path. You can also click on the yellow folder icon to browse the new file in the connected devices. A list of devices is shown in the table above.
Hint: If you keep most of your files in an USB memory stick, you can easily move the stick from your PC and your Pa2X-Pa800. In this case it may be a good idea to choose the USB stick as the device.
5. Import/Export of Standard MIDI File separated by Markers
This document explains how to import/export Styles as Standard MIDI Files (SMF from now on) separated by Markers, on a Pa2X/Pa800 with Operative System version 2.0 or higher (this functionality is not actually available in other models).
What is an SMF separated by Markers?
In our case, an SMF separated by Markers it is a single SMF containing all the Chord Variations (Variation 1, Variation 2, etc.) each one separated by a Marker (something we know about, as they are also used in Song Play mode). Instead of having to import or export a different SMF for each Chord Variation, as we had to do before the release of OS 2.0, now we can import or export a single SMF for all the Chord Variations in a single pass. This indeed looks faster and more reliable.
The relevant procedures can be found in Style Record mode:
· Import SMF: Select the SMF file to be loaded, then keep the SHIFT button pressed and touch the Execute button in the display to load it. While creating a new Style, we suggest to check the "Initialize" box. Do not check it if the SMF you are loading was previously exported from a Style to be edited; in this case, it is very important to keep all the previous settings.
· Export SMF: Keep the SHIFT button pressed and touch the Execute button in the display to select the file destination and export the Style as an SMF separated by Markers.
Importing an SMF separated by Markers into a Style
Importing an SMF separated by Markers is very similar to importing a single SMF into single Chord Variations. This procedure is described in the User's Manual. However, in this case you can import all Chord Variations in a single pass.
Style Tracks and MIDI Channels must be lined as follows, as per Korg's standard Style format definition:
| Style Track | MIDI Channel |
|---|---|
| Bass | 09 |
| Drum | 10 |
| Percussion | 11 |
| Accompaniment 1 | 12 |
| Accompaniment 2 | 13 |
| Accompaniment 3 | 14 |
| Accompaniment 4 | 15 |
| Accompaniment 5 | 16 |
Note: Tracks/MIDI Channels other than the above mentioned are ignored during the import procedure.
For a list of MIDI events supported during the import operations, please check the User's Manual. If any, the following events are stripped off and automatically transferred to the Style Element header during the import procedure:
· Time signature (this event is mandatory)
· Control Change bundle #00-32 (Bank Select MSB/LSB)
· Program Change
· Control Change #11 (Expression)
Control Change 00, Control Change 32 and Program Change messages must be placed at the very beginning of each Chord Variation (tick 0).
Whenever they are not saved in the SMF, Program Change, Control Change 00, 11 and 32, can be still programmed in Style Record mode, by using the edit features available.
Warning: Pa2X/Pa800 can only handle SMF format 0 (Zero). If you are in trouble importing your file, maybe your sequencer (or DAW) is exporting using a different format. Please refer to the software's user's manual.
The naming structure for the Markers inside the SMF is "EnCVn", whose single components are shown in the following table:
| Component | Meaning |
|---|---|
| E | Style Element (v = variation, i = intro, f = fill, e = ending) |
| n | Style Element number (1~4 for variations, 1~2 for all other style elements) |
| CV | Chord Variation (cv = chord variation - no other choices allowed) |
| n | Chord Variation number (1~6 for Variations, 1~2 for all others) |
Warning: It is mandatory not to use capital letters in Marker names.
Some examples of valid names:
i1cv2 = Intro1 - Chord Variation 2,
v4cv3 = Variation 4 - Chord Variation 3.
Examples of non accepted names:
V1cv2, v1CV2, intro i1cv2, v1cv1 chorus.
The order of the Chord Variations inside the SMF is not relevant. They can be freely placed inside the SMF.
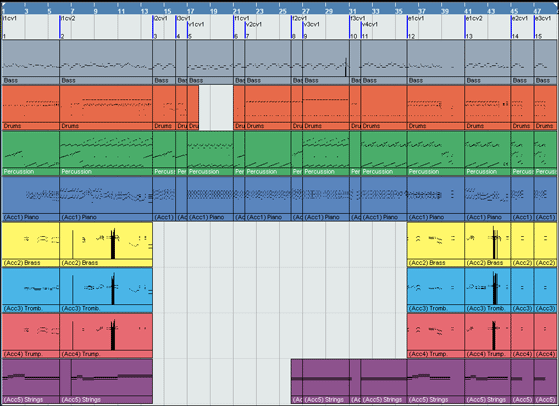
Below you can find a screenshot of a test file created in Steinberg Cubase, just as an example of how a SMF separated by Markers can look like. Considering analogies between actual workstations, it will not look much different in other applications like Logic, Digital Performer, Pro Tools or Sonar.
Exporting a Style as an SMF separated by Markers
Exporting an SMF separated by Markers is very similar to exporting a single Chord Variations as an SMF. This procedure is described in the User's Manual. However, in this case you can export all Chord Variations in a single pass.
This operation creates, in the selected device, an SMF format 0 (Zero), containing all the MIDI data included in the selected Style, with each Chord Variation starting from a different Marker (named as per the naming convention explained in the Import section above).
Each Chord Variation will include, at the very beginning (tick 0), the following informations:
· Time signature
· Control Change bundle #00-32 (Bank Select MSB/LSB)
· Program Change
· Control Change #11 (Expression)
Disclaimer: All trademarks or registered trademarks are the property of their respective owners.
Dowload this tutorial as a PDF file:  Import/Export SMF.pdf (English) (68 KB)
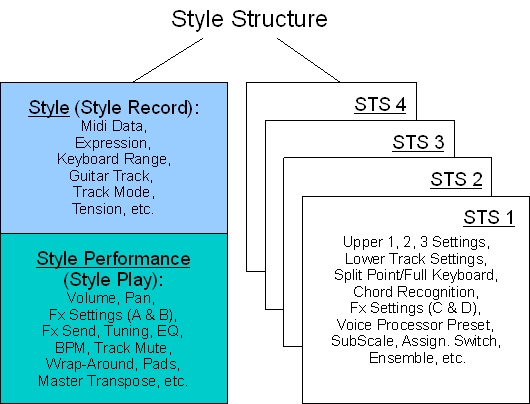
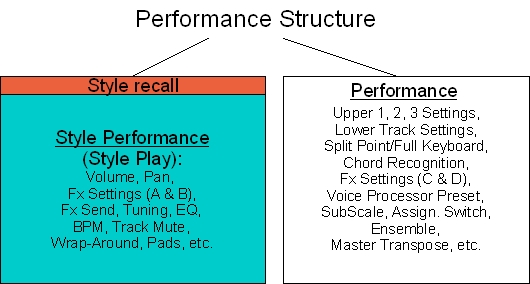
6. STS, Performance and Style Performance
STS (Single Touch Setting) and Performance store several settings for easy recall.
The following diagrams explain the data structure:
Now let's see how they work.
In Style Play Mode
STS (Single Touch Setting)
Each Style contains 4 STS each one containing different settings for the four Real Time Tracks (Upper 1, 2, 3 and Lower) including Sounds, Effects, Volume, Pan Pot, Send, Keyboard Range, Split, Voice Processor Presets, etc. Each time a Style is selected it load also its 4 STSs that can be selected or not depending on the status of the Single Touch button.
How to recall an STS: after a style has been loaded press on the STS 1, 2, 3 or 4 button on the control panel or use the Touch Screen with the STS Name tab activated in the Main Page.
How to save an STS: choose the Page Menu -> Write Single Touch Setting option or use the Shift + STS 1, 2, 3, 4 short-cut (the STS button to be pressed depends on the desired target location). This will open a dialog box allowing naming/renaming and choosing an STS location in memory. STSs are always saved in the current selected style.
Single Touch (Button)
This button has three possible options:
- Steadily On: When a Style is selected it also load its STSs and select the first one (STS 1);
- Flashing: when a Style is selected it also load its STSs and select one of the four STS according to the current selected Variation. If the Variation 1 button is lit or flashing the STS 1 is selected, if the Variation 2 button is lit or flashing the STS 2 is selected and so on. This option always select (even during normal playback) the STS number corresponding to the currently selected Variation number;
- Off: When a Style is selected it also load its STSs but none of them is selected. A STS can be manually selected later, but the STS of the current selected Styles are selected in this case. In other words it is not intended that this function keep the STSs of the previous selected Style.
At start-up, the LED of the Single Touch button is steadily on and its status cannot be saved.
Style Performance
The Style Performance stores all available Style Play Mode settings for the Style Tracks, including Volume, Pan, Fx, Wrap-Around, EQ, Tempo, Track Mute, etc. All settings available in Style Record Mode (notes, NTT settings, key, keyboard range, etc.) are not saved in the Style Performance but in the Style Pattern Style Record itself, making those two ambients environments separate as for the kind of parameters and saving procedures.
How to recall a Style Performance: A Style Performance is recalled togheter with the Style itself.
How to save a Style Performance: There is only one a single Style Performance for each Style and can be saved, only overwriting the old one in the same Style location in memory, by using the Page Menu -> Write Current Style Performance command or the shortcut Shift + any of the Style Select buttons (you do not need to press the button corresponding to the target location).
Performance
The Performance stores:
- one full Real Time Tracks setting (Upper 1, 2, 3 and Lower - see above) + Voice Processor Preset: in practice, it's the equivalent of a single STS,
- one full Style Performance (but not including the Style Record data),
- the "link" to a particular Style location, so that when the Style Change function is on, the selected Performance also recalls, togheter with the Real Time Tracks settings, a Style. This Style will not play with the original Style Performance, but with the one saved along with the Performance itself.
Let's see an example of a possible application of this concept. You have a Cool Bossa style in the Pa800 Latin style bank (location 3). Now you would like to use the same style with two different sounds: an Octave Piano and a Glide Piano (but it could also be a Flute, a Sax or whatever you like).
Now turn the Style Change and the Performance Select functions on (if any) and:
- select the "Octave Piano" Performance (Piano Bank - Page 1 - Location 3): this Performance will select an Octave Piano sound for the Real Time Tracks, the Cool Bossa style with a Style Performance at 147 BPM starting with CountIn to Variation 2, (among others).
- now select the "Glide Piano" Performance (Piano Bank - Page 2 - Location 13): this Performance will select a Glide Piano sound for the Real Time Tracks, the Cool Bossa style with a Style Performance at 156 BPM starting with Variation 3 (among others). This means that a lot of settings can be changed, including Send Fx, Fx Type, Fx Settings, Track Mute, Sounds, etc.
So we get two completely different combinations of Real Time and Backing Tracks at the touch of a button, but it's important to underline that the original Cool Bossa style remains untouched: by selecting the original style just using the style selection buttons, we can see that it's still at 148 BPM starting with Variation 1. This feature highlight the flexibility of having a style that doesn't need to be physically duplicated to be used in two or more different situations - something that is further expanded by the SongBook feature.
How to recall a Performance: turn the Performance Select button on and use the row of buttons under it, or use the "PS" area of the Main Page to open the Performance Selection Form.
How to save a Performance: using the Page Menu -> Write Performance option or the shortcut Shift + any of the Performance/Sound Select buttons. This will open a dialog box allowing naming/renaming, and a way to select a Performance location.
In Song Play Mode
STS (Single Touch Setting)
In Song Play Mode STSs can be handled by using the SongBook. Please see the SongBook section below.
Performance
In Song Play mode, the Performance recalls the Real Time Track settings only + a Vocal Processor Preset.
Recalling and saving procedures are the same as in Style Play mode.
How to recall a Performance: turn the Performance Select button on and use the row of buttons under it or use the "PS" (meaning Performance/STS) area of the Main Page display to open the Performance Selection Form.
How to save a Performance: using the Page Menu -> Write Performance option or the shortcut Shift + any of the Performance/Sound Select buttons. This will open a dialog box allowing naming/renaming and choosing a Performance location.
In SongBook
This is the most complete and flexible way to store your settings and it is based on a simple principle: here you can save everything that is necessary to play a particular song. It's not the usually concept of selecting a style or a midifile, then selecting 2, 3 or 4 different sounds or performance to play on top of it, maybe adding also a text to sing along: with a single operation you immediately get all of them. This feature is over any concept of mode (Style Play or Song Play) and it doesn't matter if you play using a style, a midifile or an Mp3: the right resource is selected along with the correct Mode to play it and adding any other useful setting like text, transpose, genre, artist name, Voice Processore preset, etc. you may have programmed before.
The following diagrams explain the SongBook data structure:
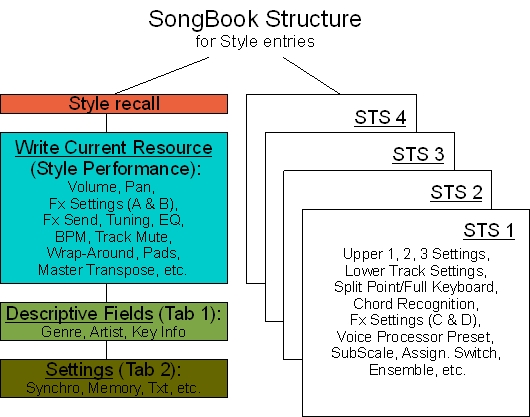
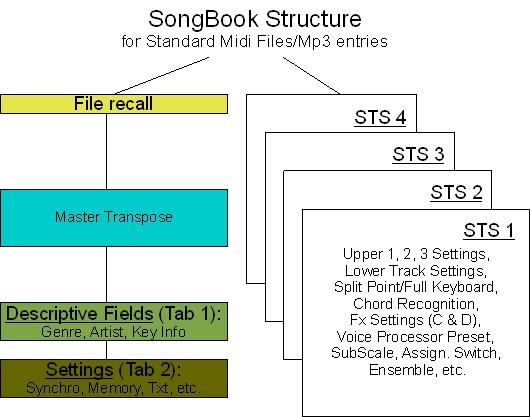
It is important to remark also that the SongBook recalls resources without making any modification to the resource itself, giving you the flexibility to share the same resource, whatever it is, for different contexts. For example, you can use the very same style to make different songs just changing the BPM, muting Tracks, changing Sounds, FX, FX Send, Eq, Volume, Pan, STS, Pads, Mic settings, Split Point, Tuning, Assignable Switch, etc. but leaving the original one untouched.
STS (Single Touch Setting)
Each song entry has its own STSs. If the entry is based on a style, these can be different from the ones in the original style, that are left untouched.
How to recall an STS: after a SongBook entry has been loaded, select STS 1, 2, 3 or 4 or use the Touch Screen display with the STS Name tab activated in the Main Page.
How to save an STS: with the SongBook open, select the "Book Edit 1" tab, check the "Write STS" box, choose to save one (the current selected sound) or all (the current selected style STS), then push the "Write" button in the lower-right side of the screen to save the settings.
Single Touch (Button)
This button works in a different way depending on the type of resource selected (Style or Standard MIDI File/Mp3).
Using Styles: it works the same as in Style Mode (see above).
Using Standard MIDI Files/Mp3:
- Steadily On or Flashing: 1) if none of the two Sequencers is playing, the Song is loaded into Sequencer 1 along with the STS, and STS1 is selected; 2) if one of the Sequencers is playing the Song is loaded into the other one, and the current STSs of the playing Sequencer are kept to avoid interference. When the new song starts (just using the Play button) then the STSs are loaded and STS1 is selected.
- Off: 1) if none of the two Sequencers is playing the Song is loaded into Sequencer 1 along with the STSs, but none of them is selected; 2) if one of the Sequencers is playing, the Song is loaded into the other one and the current STSs of the playing Sequencer are kept to avoid interference. When the new song starts (just using the play button) then the STSs are loaded but none of them is selected.
Performance
The Performance is not saved/recalled anywhere in the SongBook (you use the STSs instead) but can be accessed anyway when the four STS are not enough or for any other particular reason. It looks logical anyway to program at the best the four STS for any SongBook entry that in most cases fit the job.
Recalling and saving procedures are the same as in the Style Play and Song Play modes.
How to recall a Performance: turn the Performance Select button on and use the row of buttons under it or use the "PS" (meaning "Performance/STS") area of the Main Page display to open the Performance Selection Form.
How to save a Performance: using the Page Menu -> Write Performance option or the shortcut Shift + any of the Performance/Sound Select buttons. This will open a dialog box allowing naming/renaming and choosing a Performance location.
Copyright © 2026 KORG Inc. All Rights Reserved.
Choose Your Location ![]()