Now that you’ve made all the connections and the power turns on normally, get your drumsticks ready and play the pads.
When you strike a pad with your drumsticks, for example, sound plays from the headphones connected to the PHONES jack on this unit, and from the powered monitor speakers or other audio equipment connected to the MAIN OUT L (MONO), R jacks.
Use the PHONES knob to adjust the volume of sound coming from the headphones jack, and use the MAIN VOL. knob to adjust the volume of the MAIN OUT L (MONO), R jacks.
On some KITs, the sound can change or the effects may sound different depending on how hard you strike the pads.
The pads make sounds when you strike them if the LED in front of each pad is lit up in blue (cyan) or in red (magenta). The LEDs light up more brightly when the pads are making sounds.
The LED colors differ depending on the sound that’s assigned to the pad, as follows:
Red (magenta): one-shot sound; blue (cyan): repeating sound; green (viridian): no sound (no assignment)
There are four thinner pads located at the top of the panel. These pads sense where they are struck, and are called CC pads. You can use the position sensing feature of these CC pads to control the effect parameters and so on.
For instance, you can play these pads continuously from left to right to achieve the effect of a filter opening, among other effects.
A bar is shown for the current position of the CC pad on the top page of display KIT mode, for KITs whose CC pad is enabled (if the SW MODE is LOOPER or SET LIST).
By switching the SW MODE to CC PAD, you can use the track 1–4 buttons to switch the CC pad function on/off.
A “KIT” consists of 10 pad sounds in the MPS-10, four pad sounds that can be connected externally, and the sound that can be played when you press a connected expression pedal, for a total of 15 different sounds.
By selecting this KIT, you can switch between the sounds assigned to each pad and play them.
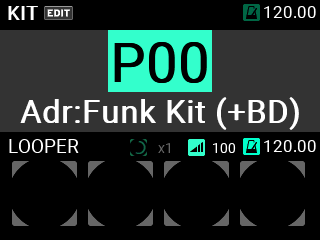
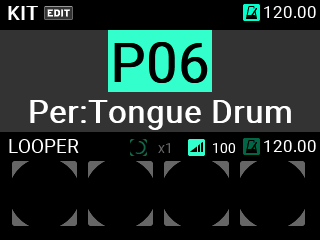
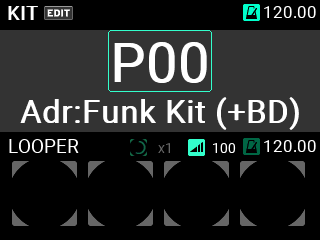
The page that’s shown on the display when you turn on the power is called the “top page”.

The KIT number and name, CC pad state, looper status and so on are shown on the top page. You can use the KIT + and – buttons as well as the VALUE knob to switch between KITs. You can also use the pads or a footswitch to change the KITs.
Using the button to select a KIT
Press the KIT + and – buttons to switch between the KITs before and after the current KIT.
When you select KITs in order, this lets you quickly switch between them when you’re performing.
Using the knob to select a KIT
You can also use the VALUE knob to select a KIT number, which lets you freely switch between KITs.
1 Turn the VALUE knob to move the cursor to a KIT number.
2 Press the ENTER button (VALUE knob) to highlight the KIT number.
3 Turn the VALUE knob to select the KIT number.
When you switch to a different KIT, the KIT number and name blink. This means that you haven’t yet switched to the new KIT.
4 Once you press the ENTER button (VALUE knob), the KIT number you selected is confirmed.
Tip: There are 200 KITs included on the MPS-10. The first 100 KITs are preset KITs, and the last 100 KITs are user KITs.
What you can do on the top page
On the top page, aside from selecting KITs you can select looper tracks, configure the functions for the CC pads, select the set lists and so on.
By pressing the SW MODE button, you can change the functions called up by the TRACK 1–4 buttons (a total of three types).
Here’s an explanation of the operations you can access when the top page is shown.
The MPS-10 features a four-track looper. Using the Looper function
When in Looper mode, the TRACK 1–4 buttons operate as looper tracks.
Large TRACK buttons are available on the bottom part of the control panel, giving you smooth access to the tracks while you’re playing.
With the looper, you can record the same sound that’s output from the MAIN OUT L (MONO), R jacks (what you play on the pads as well as the AUX IN/MIC IN input audio) for endless overdubbing.
You can freely switch between KITs while the looper is playing, which lets you overdub sounds from different KITs or play different KITs while the looper is playing back.
Note: Note that the metronome can’t be recorded.
Note: When you press the SW MODE button while the looper is operating, the rec, overdub and erase rec operations stop, and the unit enters Playback mode.
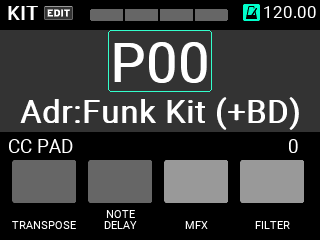
You can use the CC pads to detect where you strike the pads and then use that data to control the functions that you set.
The four functions that can be controlled by the CC pads include TRANSPOSE, NOTE DELAY, MFX and FILTER.
In CC PAD mode, you can use the TRACK 1–4 buttons to temporarily switch these functions on/off.
Refer to KIT EDIT menu in this manual for the detailed settings.
When SW MODE button is lit, long-press the SW MODE button to turn the SET LIST function on.
You can use the SET LIST function to set the order in which the KITs are recalled as you like, without the need to actually reorder the KITs.
While the SET LIST function is on, SET LIST MODE is added to SW MODE, and pressing the SW MODE button toggles between LOOPER, CC PAD and SET LIST.
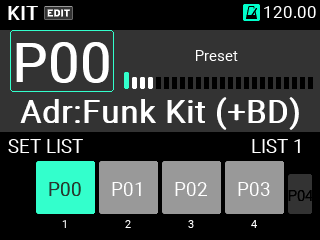
In SET LIST mode, use the TRACK 1–4 buttons to switch between KITs.
The KIT numbers registered to the set list are shown in groups of four in the bottom of the screen.
Switch to a different KIT by pressing one of the TRACK 1–4 buttons that’s lit green.
You can also use the KIT +/- buttons and the VALUE knob to switch the KITs to show list numbers in a set list.
The numbers below the KIT numbers show the list numbers within the set list.
Also, the KIT numbers that are dimly shown to the left and right show the list numbers before and after the four KITs that are currently shown.
See SET LIST for how to edit the set list.
Note: Long-press the SW MODE button while in SET LIST mode to exit SET LIST mode.
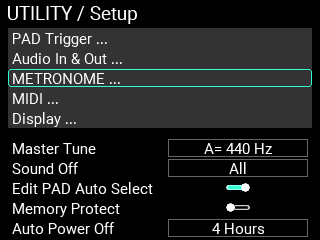
The MPS-10 features a metronome, which acts as a guide to help you keep the tempo.
1 The metronome starts and stops with each press of the METRONOME knob.
2 Turn the METRONOME knob to adjust the tempo.
3 You can set the time signature, metronome sound and volume in the METRONOME menu on the Setup page, accessible from the UTILITY button.

4 Save the modified setting.
To save the new setting, press the WRITE button.
An alert window is shown when you press the WRITE button. Press the ENTER button to save.
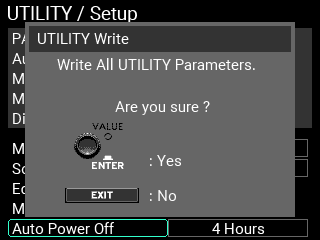
If you decide to cancel saving, press the EXIT button.