The UTILITY menu of the MPS-10 contains many functions and settings.
To use the UTILITY functions, press the UTILITY button to enter UTILITY mode.
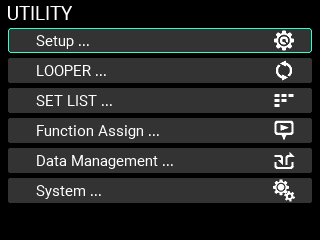
If you’re accessing a page for which the UTILITY button is not lit, press the EXIT button repeatedly until you get to a page where the UTILITY button lights up.
From this screen, you can configure the pad triggers, audio input/output, metronome, MIDI, display indications and other functions.

Master Tune 430 Hz...450 Hz
Lets you set the basic tuning of the MPS-10. (The default setting is “440 Hz”.)
Note: When the “M.Tune” OSC setting for the INST is “ON”, Master Tune is enabled.
Sound off All, Before KIT Change
Sets the function of the SOUND OFF button.
All: Stops the sound of all pads that are outputting sound.
Before KIT Change: Stops the sounds of the KIT you used before switching to a different KIT.
Edit PAD Auto Select On, Off
By striking the pad in the location where you can select the pad number, you can set whether to enable the pad selection function.
Memory Protect On, Off
Sets whether to prohibit the internal memory from being written to (overwritten).
Note: When this is on, you can’t overwrite the KITs, INSTs or SAMPLEs. You can use the looper, but you can’t use the Write function to write any data.
Note: You can save data in UTILITY mode (including looper setup and set list data) even when Memory Protect is “ON”.
Auto Power Off Disable, 30 Minutes, 4 Hours
Sets whether the auto power-off function is enabled or disabled.
When the auto power-off function is enabled, the power automatically turns off when a certain length of time has elapsed since the pads were played or the unit was operated. (The default setting is “4hours”.)
Use the dial if you wish to change this to a different setting.
Note: The auto power-off count will be canceled under any of the following conditions:
When the panel is operated, a pad is triggered, the looper or a recorded SAMPLE is played back, the metronome is used, SysEx data is received via USB MIDI, or when an import/export is executed that includes SAMPLE data.
This screen lets you configure the trigger settings for each of the 15 pads built into the MPS-10.
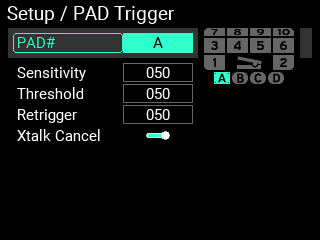
PAD# 1...10 / A,B,C,D / Pedal
Specifies the number of the pad for which you want to configure the trigger settings.
Note: You can change the pad number by striking the pads.
Sensitivity 0...100
Adjusts the trigger sensitivity.
Threshold 0...100
Adjusts the minimum striking force required to make the pad react. This has no effect on the pedal.
Retrigger 0...100
This makes adjustments to improve retriggering.
Note: Increase the retriggering value to avoid pads sounding two notes when played only once. Note that this will make the pad less able to detect drum rolls. When you lower this value, you will be able to play intricate flams, but the pad will be more likely to sound twice with one stroke.
XTalk Cancel On, Off
You can configure the MPS-10 to cancel out the resonance from other pads when a pad sounds.
Turn this on to reduce resonance. This is enabled when used with external triggers (A–D).
Note: When this is set to “On,” striking two pads at the same time may be considered as resonance, and the sound from one of the pads may not be heard as a result. If this happens, turn the setting off and check again.
Use this screen to edit the parameters related to audio input/output.
Tip: There are three “Audio In & Out” settings: “Input”, “Output” and “Out Routing”. Use the METRONOME knob to switch between setting pages.
Input
AUX In Level 0...100
Adjusts the signal volume for the jack selected in AUX In Select.
AUX In Select Line, Mic Unbalanced, Mic Balanced, None
Sets the jack used for AUX IN.
Line: Uses the audio input that’s connected to the LINE IN jack.
Mic Unbalanced: Uses the monaural mic input that’s connected to the MIC IN jack.
Mic Balanced: Uses the XLR mic input that’s connected to the MIC IN jack.
None: Disables audio input from the LINE IN and MIC IN jacks.
Mic Gain -12dB...32dB
This adjusts the input gain for the MIC IN jack.
Line Gain -12dB...32dB
This adjusts the input gain for the LINE IN jack.
USB Audio In Level 0...100
Adjusts the volume of signal input via USB audio.
Output

Link SUB OUT to MAIN VOL On, Off
You can set the MAIN VOL. knob on the panel to also change the SUB OUT when you move the MAIN VOL. knob.
SUB OUT Level 0...100
When “Link SUB OUT to MAIN VOL” is disabled, this adjusts the volume of signal that’s output from SUB OUT.
Line Out Gain -6dB, 0dB, +6dB, 12dB
Adjusts the volume of signal that’s output from MAIN OUT and SUB OUT.
Note: The -6dB setting outputs at around half volume, the +6dB setting is around twice the volume, and the +12dB is around four times the volume. Note that the signal tends to clip when you raise the volume too far.
Out Routing
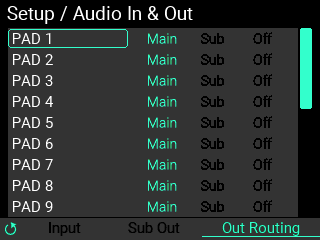
Use this screen to set the output destination for each pad, IFX 1, 2, the loop, metronome, AUX In and USB In.
Use the VALUE knob to select the output source, and press the ENTER button to toggle between “Main”, “Sub”, “Off” and “Main” settings.
Note: When Metronome, AUX In and USB In are set to “Off”, nothing is output from MAIN OUT or SUB OUT, but signal is output from PHONES.
This screen lets you configure the settings for the metronome built into the MPS-10.

Level 000...100
Adjusts the volume of the metronome.
Beat 1/2...24/2, 1/4...24/4, 1/8...24/8, 1/8t...24/8t, 1/16...24/16
Sets the metronome’s beat (time signature).
Sound
Selects the metronome sound (10 sounds are available).
For details on the parameters, refer to the “Effect type list” in the preset list (PDF).
Pan L16...Center...R16
Sets the metronome panning (left-right volume balance).
Configures the settings for transmitting and receiving MIDI signals.
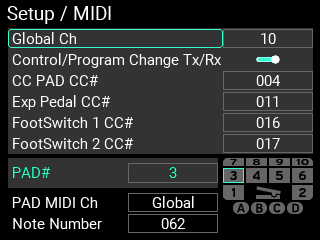
Global Ch 1...16
Specifies the MIDI channel of the MPS-10.
To receive/transmit program changes or other data via MIDI, set the MIDI channel of this unit to match the MIDI channel of the connected MIDI device.
Control/Program Change Tx/Rx On, Off
Sets whether program changes and control changes are transmitted and received.
CC PAD CC# 000...119
Sets the CC (control change) number that’s output when you operate a CC pad, as well as the number that’s used to control this unit from an external MIDI device.
Exp Pedal CC# 000...119
Sets the CC (control change) number that’s output when you operate the expression pedal, as well as the number that’s used to control this from an external MIDI device.
FootSwitch 1 CC# 000...119
Sets the CC (control change) number that’s output when you operate foot switch 1, as well as the number that’s used to control this from an external MIDI device.
FootSwitch 2 CC# 000...119
Sets the CC (control change) number that’s output when you operate foot switch 2, as well as the number that’s used to control this from an external MIDI device.
PAD# 1...10 / A,B,C,D / Pedal
Specifies the number of the pad for which you want to configure the MIDI settings.
Tip: You can change the pad number by striking the pads.
PAD MIDI Ch Global, 1...16
Sets the MIDI channel for each pad. Pads that are set to “Global” use the global channel specified in the global parameters.
Note Number 0...127
Sets the note number for each pad.
Use this screen to configure the screen and LED display for the MPS-10.
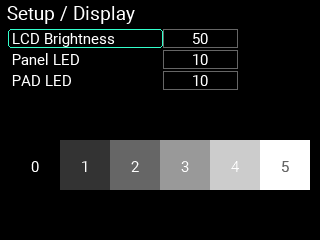
LCD Brightness 1...100
Adjusts the display backlight’s brightness.
Panel LED 1...10
Sets the brightness of the panel LEDs.
PAD LED 1...10
Sets the brightness of the pad LEDs.
The MPS-10 features a four-track looper. With the looper, you can record the same sound that’s output from the MAIN OUT L (MONO), R jacks (what you play on the pads as well as the AUX IN/MIC IN input audio) for endless overdubbing.
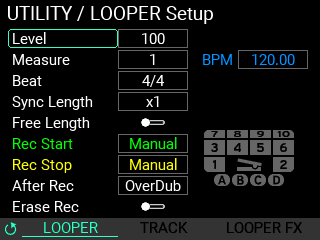
Refer to LOOPER edit menu in this manual for the detailed settings.
The MPS-10 features a “set list” function, which lets you recall a set list of up to eight different KITs in the order that you like.
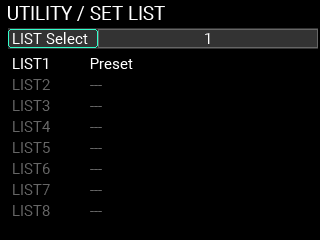
LIST Select 1...8
Selects the set list you want to use out of the eight set lists that are registered.
LIST1...8
You can register up to eight set lists.
Using this unit with the set lists
When you select one of the lists (1–8), the screen switches to the set list edit page.
Register the KITs in the order you want within the selected set list. You can register up to 24 KITs.
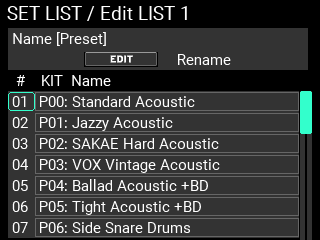
Name [---] .
Press the EDIT button to change the name of the selected set list. Using the Name dialog box (how to change the name)
#, KIT Name
The numbers shown in the “#” column (01–24) represent the numbers within the set list. Use the VALUE knob to select the number of the KIT you want to edit in the set list, and press the ENTER button to edit the KIT whose number you selected.
Press the KIT + button to insert the currently selected KIT into the list.
Press the KIT - button to delete the currently selected KIT from the list.
Note: Once you’ve deleted all KITs from the list, that set list is deleted from the selectable set lists in LIST Select. However, you can’t delete the set list if it is the only remaining set list that can be selected.
Tip: When you delete all registered KITs to clear the list, that set list is deleted.
You can assign performance functions like KIT change, FX ON/OFF and so on to be triggered by the pads, foot switches and pedal.
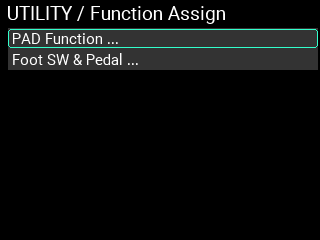
Function Assign / PAD Function
On this screen, you can assign the following functions to the 15 pads built into the MPS-10.
Tip: You can’t assign more than one function to the same pad.
Tip: “--” indicates that the function is not assigned to a pad.
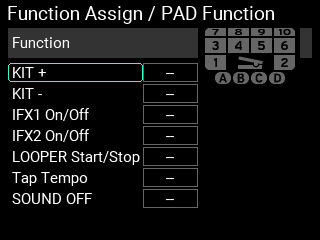
KIT+ PAD1...PAD10 / A,B,C,D / Pedal
Sets the pad that’s used for changing to the next KIT.
KIT- PAD1...PAD10 / A,B,C,D / Pedal
Sets the pad that’s used for changing to the previous KIT.
IFX1 On/Off PAD1...PAD10 / A,B,C,D / Pedal
Sets the pad that enables/disables Insert FX1.
IFX2 On/Off PAD1...PAD10 / A,B,C,D / Pedal
Sets the pad that enables/disables Insert FX2.
LOOPER Start/Stop PAD1...PAD10 / A,B,C,D / Pedal
Sets the pad that starts/stops the looper.
When you strike the pad that’s specified here and multiple tracks are already playing, all tracks stop.
When you strike the pad while multiple tracks are stopped, all tracks begin playing.
Tap Tempo PAD1...PAD10 / A,B,C,D / Pedal
Sets the pad that adjusts the BPM via tap tempo.
SOUND OFF PAD1...PAD10 / A,B,C,D / Pedal
Sets the pad that works the same as the SOUND OFF button on the panel.
Function Assign / Foot SW & Pedal
On this screen, you can assign the following functions to the two foot switches and the expression pedal of the MPS-10.
Foot Switch
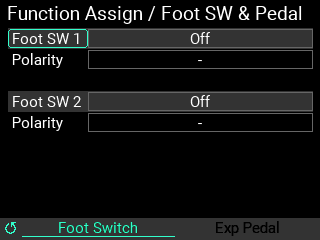
Foot SW1,2 Off, KIT+, KIT-, IFX1 On/Off, IFX2 On/Off,
LooperPlay Start/Stop, LooperRec Start/Stop, Tap Tempo, SOUND OFF
Use this to set which function to assign to the connected foot switches.
Polarity -, +
Lets you change the polarity of the function.
Set this according to the foot switch you’re using.
Exp Pedal
Use the METRONOME knob to switch to the Exp Pedal page.
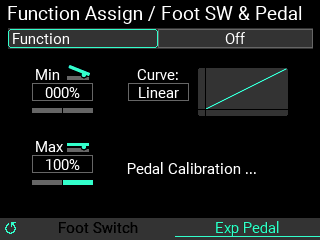
Function Off, Looper Volume, Filter Cutoff, Reverb Mix
Sets the function that’s assigned to the expression pedal connected to this instrument.
Min -100%...+100%
Set the minimum value for the pedal.
Max -100%...+100%
Set the maximum value for the pedal.
Curve Linear, Exp1, Exp2, Exp3, Log1, Log2, Log3
Selects one of seven settings for the pedal output value curve.
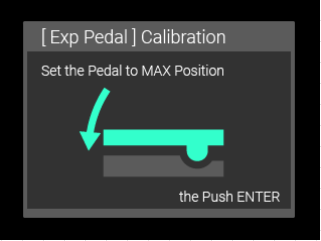
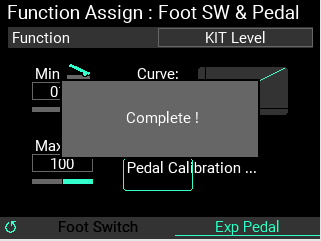
Select “Pedal Calibration” to calibrate the pedal that’s connected.
You can select “Pedal Calibration” to calibrate the expression pedal that’s connected.
1 With the pedal pushed all the way down with your toes (maximum position), press the ENTER button.
2 With the pedal pushed all the way down with your heel (minimum position), press the ENTER button.

3 The calibration is finished when you see the message “Complete!”
From this screen, you can import, export, change the filenames and registered categories, delete and perform other operations on the various data used by the MPS-10. Connect a USB flash drive to this unit.
Note: You can’t use the “Import & Export” functions if you haven’t inserted a USB flash drive.
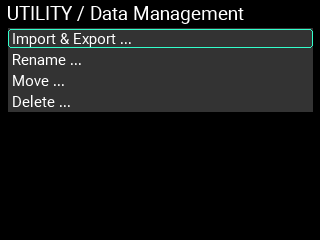
This screen is for exporting or importing the various data used by the MPS-10, to or from a USB flash drive.
Each data item used for “All User Data” and “LOOPER Data” contains multiple files, which are imported or exported all at once as a folder.
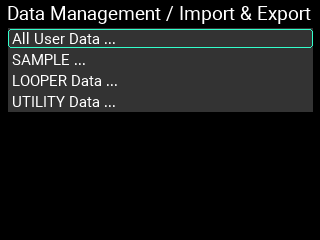
Import & Export / All User Data
“All User Data” includes all the settings and data (KITs, INSTs, SAMPLEs, looper and UTILITY) that are saved.
Move the cursor to “All User Data” on the Import & Export top page, and press the ENTER button to enter the Import & Export page for “All User Data”.

How to import all user data
Here’s how to import all user data into internal memory from a USB flash drive.
1 Move the cursor to “Folder” and press the ENTER button to show the list of “All User Data” folders that are saved to the USB flash drive.
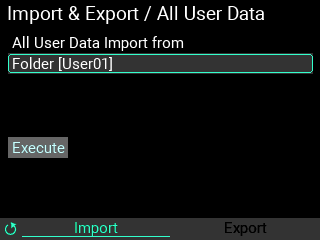
2 Use the VALUE knob to select the “All User Data” set that you want to import, and press the ENTER button to confirm.
3 Move the cursor to “Execute” and press the ENTER button. A message is shown on the page, confirming whether you want to import the set of “All User Data”.
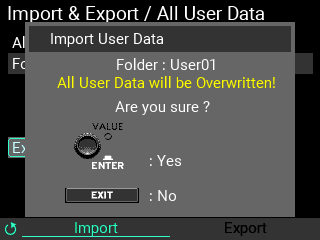
Press the ENTER button to execute. Press the EXIT button to cancel.
Note: If you cancel the Import All User Data operation while it is in progress, all user data returns to the factory default settings.
How to export all user data
Here’s how to save the current set of “All User Data” to a USB flash drive.
1 Turn the METRONOME knob to switch from the “Import” page to the “Export” page.
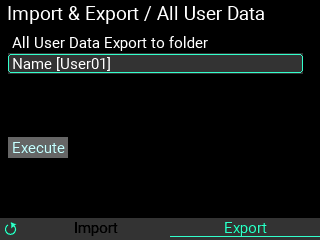
Move the cursor to “Name” and press the ENTER button to show the rename page. Using the Name dialog box (how to change the name)
2 Move the cursor to “Execute” and press the ENTER button. A message is shown on the page, which confirms whether you want to export the set of “All User Data”. Press the ENTER button to execute. Press the EXIT button to cancel.
If there is already a file with the same name when you press “Execute”, the message shown below appears.
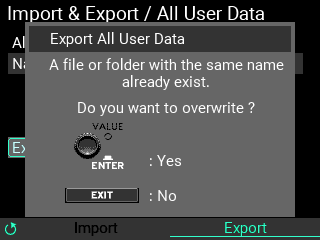
To overwrite the data, press the ENTER button. To rename the data, press the EXIT button.
Note: If you cancel the Export All User Data operation while it is in progress, the data with the specified name is deleted from the USB flash drive.
Note: SAMPLEs saved to this unit that have a long recording time might take a while to export when you use the “Export All User Data” command.
Note: To delete the data that’s saved, delete the subfolder with the name you specified in “Name,” located in the “ALL_DATA” subfolder of the “MPS_10” folder.
The MPS-10 lets you import external SAMPLE data by using a USB flash drive and then assign this data to the pads, just like with the internal SAMPLEs.
The SAMPLEs that you create on this device can be exported as WAV files.
Note: Supported SAMPLE data formats are WAV or AIFF (16-bit, mono/stereo, 44.1/48 kHz, up to 60 minutes long).
Move the cursor to “SAMPLE” on the Import & Export top page, and press the ENTER button to enter the Import & Export page for “All User Data”.
How to import SAMPLEs
Here’s how to import the SAMPLE data saved on a USB flash drive into the MPS-10.
1 Import the SAMPLE data file that’s saved to the USB flash drive into internal memory.
Note: Store the SAMPLE data files along with the folders that contain the SAMPLE data files in the “SAMPLE” subfolder, located in the “MPS_10” folder on the USB flash drive. Any other SAMPLE data files stored on the USB flash drive are not imported into the MPS-10.
2 Move the cursor to “File” and press the ENTER button to show the list of SAMPLE data files and folders that are saved to the USB flash drive.
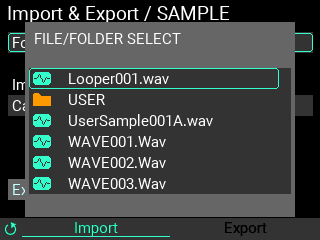
Use the VALUE knob to select the SAMPLE data files and folders that you want to import, and press the ENTER button to confirm. This works differently depending on whether you’re importing SAMPLE data files or folders.
Tip: SAMPLE data files are shown with a green mark, and folders are shown with an orange mark.
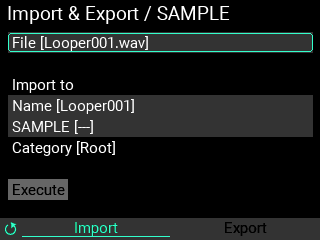
When a SAMPLE data file is selected
When you select a SAMPLE data file, the filename of that SAMPLE is shown (without the extension) as “Name [ ]”.
Select “Name [ ]” and press the ENTER button to show the SAMPLE name editing screen. Using the Name dialog box (how to change the name)
Move the cursor to “SAMPLE [ ]”, and specify the write destination on the MPS-10. Press the ENTER button to show a list of SAMPLEs that are registered on the MPS-10.
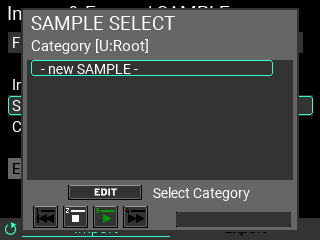
Tip: You can press the EDIT button to change the category, and you can also create new categories.
Note: Use caution when you select an existing SAMPLE, as its data will be overwritten and the data will be lost.
To create a new SAMPLE, select “- new SAMPLE -”.
Move the cursor to “Execute” and press the ENTER button. A message is shown on the page, confirming whether you want to import the data.
Press the ENTER button to execute. Press the EXIT button to cancel.
Note: If you cancel the operation while in progress, the SAMPLE being imported is discarded.
When a folder containing multiple SAMPLE data files is selected
After selecting the folder, specify the write destination on the MPS-10. When you select a folder, this only specifies the category, not the SAMPLE.
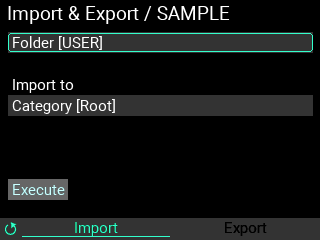
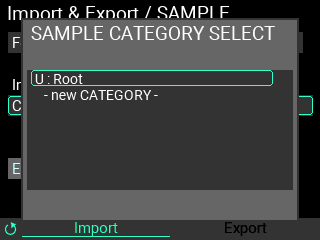
Move the cursor to “Category” and press the ENTER button to show a list of categories for the SAMPLEs that are registered on the MPS-10.
Note: A new category is created when you select “- new CATEGORY -”.
After selecting “Category”, the screen looks like this.
Move the cursor to “Execute” and press the ENTER button. This imports the readable SAMPLE data files within the folder as new SAMPLEs.
Note: Cancel the operation while in progress if you want to stop importing. Note that the SAMPLEs that were imported up to that point remain in internal memory.
Note: When creating a new SAMPLE, the SAMPLE name is used for the filename. Use only alphanumeric characters for the filename. (Japanese filenames cannot be used.)
How to export SAMPLEs
Here’s how to export the SAMPLE data saved in this unit to a USB flash drive.
1 Turn the METRONOME knob to switch from the “Import” page to the “Export” page.
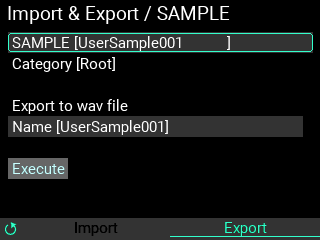
2 Move the cursor to “SAMPLE” and press the ENTER button. A page listing the SAMPLEs in this unit is shown.

Note: You can press the EDIT button to change the category.
3 When you confirm a SAMPLE by pressing the ENTER button, the “Category” and “Name” are shown for the selected SAMPLE data.
4 Next, specify the filename of the SAMPLE to export.
Move the cursor to “Name” and press the ENTER button to show the rename page. Using the Name dialog box (how to change the name)
5 Move the cursor to “Execute” and press the ENTER button. A message is shown on the page, confirming whether you want to export the selected SAMPLE. Press the ENTER button to execute. Press the EXIT button to cancel.
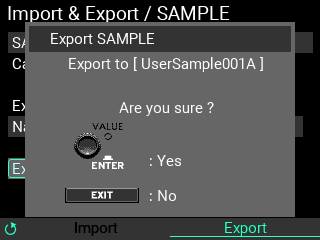
Note: If there is already a file with the same name when you press “Execute”, the message shown below appears.
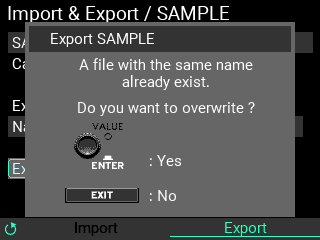
To overwrite the existing data, press the ENTER button. To go back and rename the data, press the EXIT button.
Note: When you cancel the export SAMPLE operation, the export stops and the file currently being exported is deleted from the USB flash drive.
Note: To delete the data that’s saved, delete the WAV file with the name you specified in “Name,” located in the “SAMPLE” subfolder of the “MPS_10” folder on the USB flash drive.
“Looper data” refers to the collection of saved audio data from the four tracks, as well as the looper setup parameters.
Move the cursor to “LOOPER Data” on the Import & Export top page, and press the ENTER button to enter the Import & Export page for “LOOPER Data”.
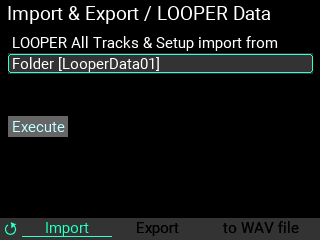
How to import looper data
Here’s how to import all looper data into internal memory from a USB flash drive.
1 Move the cursor to “Folder” and press the ENTER button to show the list of “LOOPER Data” folders that are saved to the USB flash drive.
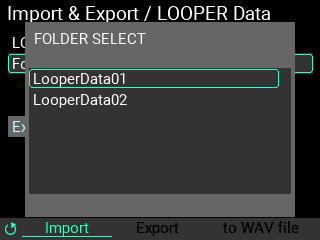
Use the VALUE knob to select the looper data that you want to import, and press the ENTER button to confirm.
2 Move the cursor to “Execute” and press the ENTER button. A message is shown on the page, confirming whether you want to import the selected set of looper data.
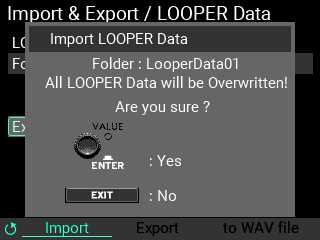
Press the ENTER button to execute. Press the EXIT button to cancel.
How to export looper data
Here’s how to save the current set of looper data to a USB flash drive.
1 Turn the METRONOME knob to switch from the “Import” page to the “Export” page.
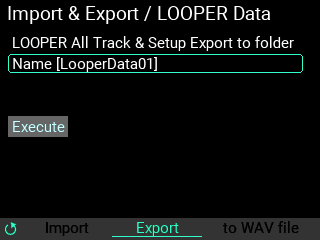
Note: Move the cursor to “Name” and press the ENTER button to show the rename page. Using the Name dialog box (how to change the name)
2 Move the cursor to “Execute” and press the ENTER button. A message is shown on the page, confirming whether you want to export the selected set of looper data. Press the ENTER button to execute. Press the EXIT button to cancel.
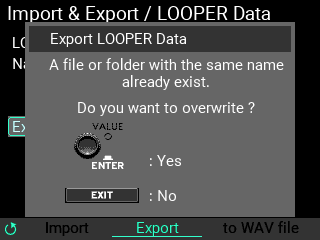
Note: If there is already a folder with the same name when you press “Execute”, the message shown below appears. To overwrite the existing data, press the ENTER button. To go back and rename the data, press the EXIT button.
Note: To delete the data that’s saved, delete the folder with the name you specified in “Name,” located in the “LOOPER” subfolder of the “MPS_10” folder on the USB flash drive.
How to export to a WAV file
You can save the audio data that’s recorded in a specified track to a USB flash drive as a WAV file.
1 Turn the METRONOME knob to switch to the “to WAV file” page.
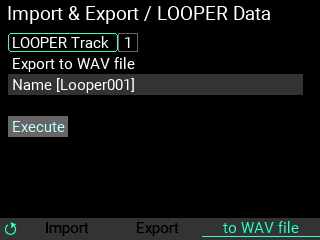
2 Move the cursor to “LOOPER Track” and press the ENTER button, then select the track you want to export.
Note: You can’t export all four tracks at the same time.
Note: Move the cursor to “Name” and press the ENTER button to show the rename page. Using the Name dialog box (how to change the name)
3 Move the cursor to “Execute” and press the ENTER button. A message is shown on the page, confirming whether you want to export the WAV file for the selected track. Press the ENTER button to execute. Press the EXIT button to cancel.
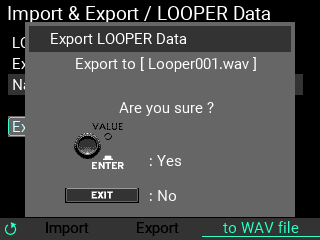
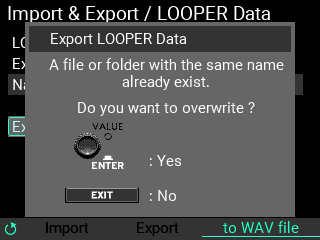
Note: If there is already a file with the same name when you press “Execute”, the message shown below appears. To overwrite the existing data, press the ENTER button. To go back and rename the data, press the EXIT button.
Note: To delete the data that’s saved, delete the WAV file with the name you specified in “Name,” located in the “SAMPLE” subfolder of the “MPS_10” folder on the USB flash drive.
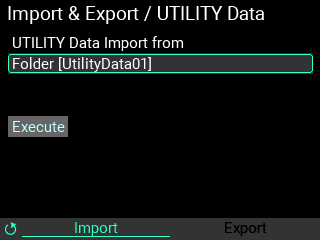
Import & Export / UTILITY Data
The UTILITY data is a set of data that contains the setting parameters for the Setup, SET LIST and Function Assign screens.
Move the cursor to “UTILITY Data” on the Import & Export top page, and press the ENTER button to enter the Import & Export page for “UTILITY Data”.
How to import the UTILITY data
Here’s how to import all UTILITY data into internal memory from a USB flash drive.
1 Move the cursor to “Folder” and press the ENTER button to show the list of “UTILITY Data” folders that are saved to the USB flash drive.
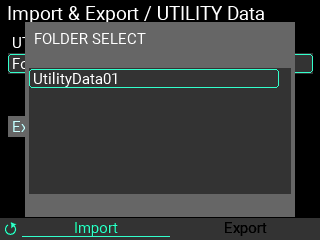
2 Use the VALUE knob to select the UTILITY data that you want to import, and press the ENTER button to confirm.
After that, move the cursor to “Execute” and press the ENTER button. A message is shown on the page, confirming whether you want to import the set of UTILITY data.
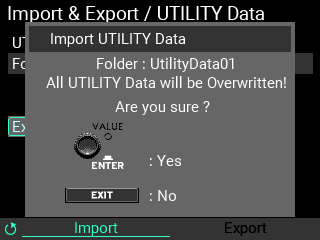
Press the ENTER button to execute. Press the EXIT button to cancel.
How to export UTILITY data
Here’s how to save the current set of UTILITY data to a USB flash drive.
1 Turn the METRONOME knob to switch from the “Import” page to the “Export” page.
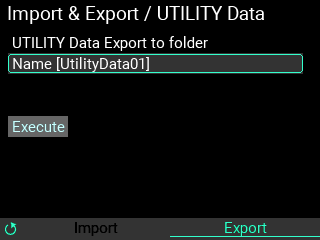
Move the cursor to “Name” and press the ENTER button to show the rename page. Using the Name dialog box (how to change the name)
2 Move the cursor to “Execute” and press the ENTER button. A message is shown on the page, confirming whether you want to export the selected utility data. Press the ENTER button to execute. Press the EXIT button to cancel.
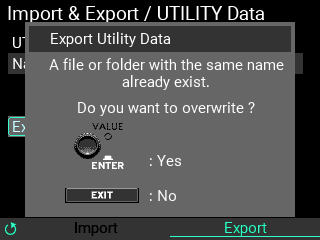
Note: If there is already a folder with the same name when you press “Execute”, the message shown below appears. To overwrite the existing data, press the ENTER button. To go back and rename the data, press the EXIT button.
Note: To delete the data that’s saved, delete the subfolder with the name you specified in “Name,” located in the “UTILITY” subfolder of the “MPS_10” folder.
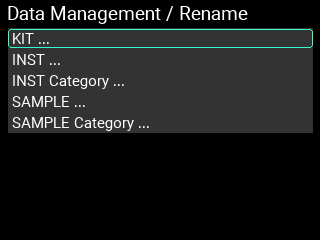
You can change (rename) the names and category names of the KITs, INSTs and SAMPLE data that you create. However, you can’t rename the preset data.
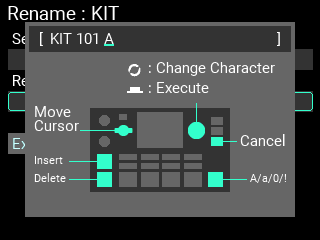
Here’s an example of renaming, using a user KIT named “KIT 101”.
1 Select “KIT...” on the Data Management/Rename page, and press the ENTER button.
2 Select the KIT to rename.

3 Edit the name of the KIT to rename. Using the Name dialog box (how to change the name)
4 Move the cursor to “Execute” and press the ENTER button. The following confirmation message is shown.
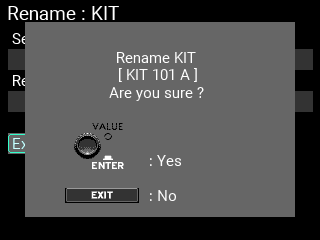
Tip: If there is already a file or category with the same name as the one you just renamed when you press “Execute”, the message shown below appears.
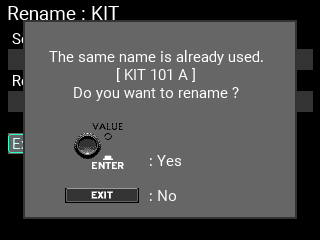
If you rename the file here, the existing file is not overwritten, but a new file with the same name is registered in that category.
5 Press the ENTER button again to finish renaming.
Note: You can’t rename the “Root” category.
Note: To rename the INST (instrument) or SAMPLE data or categories, select “INST ...”, “INST Category ...”, “SAMPLE ...” or “SAMPLE Category” in step 1 above first.
You can change (move) the categories to which the INST and SAMPLE data is registered. However, you can’t move the preset data.
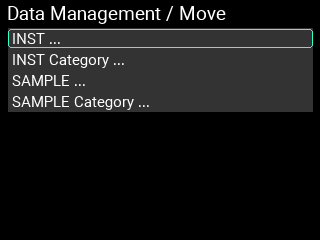
Changing the categories to which the INST and SAMPLE data are registered
In this example, we change the category to which the user INST “Instrument 001” is registered, from “Root” to “UserCategory001”.
1 Select “INST...” on the Data Management/Rename page, and press the ENTER button.
Tip: To move the SAMPLE data, select “SAMPLE ...” here.
2 Select the INST to move.
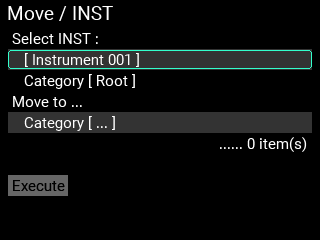
3 Select the category to which you want to move the INST.
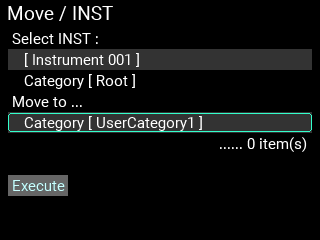
4 Move the cursor to “Execute” and press the ENTER button. The following confirmation message is shown.

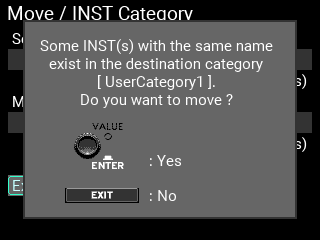
Note: If there is already data in the move destination category with the same name as the one you are moving when you press “Execute”, the message shown below appears.

If you move the data in this state, the existing data is not overwritten, but new data with the same name is registered in that category.
5 Press the ENTER button to finish moving.
Changing the registered category for all data within a category
In this example, we move all INST data in the “Root” category to “UserCategory001”.
1 Select “INST Category ...” on the Data Management/Move page, and press the ENTER button.
Tip: To move the SAMPLE data within a category, select “SAMPLE Category ...” here.
2 Select the category from which you want to move the data.
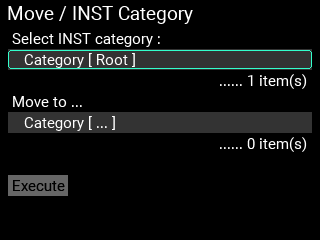
3 Select the category to which you want to move the data.
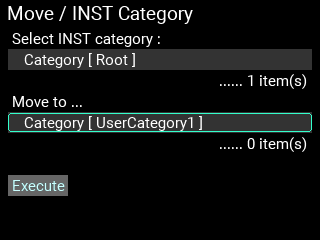
4 Move the cursor to “Execute” and press the ENTER button. The following confirmation message is shown.
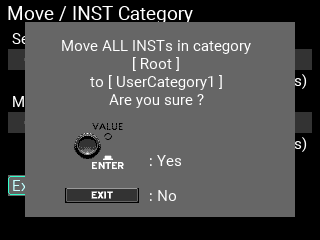
Note: If there is at least one SAMPLE data item in the move destination category with the same name, the message shown below appears.
If you move the data in this state, the existing data is not overwritten, but new data with the same name is registered in that category.
5 Press the ENTER button to finish editing the registered category.
Note: It may take some time if you try to move a lot of data all at once.
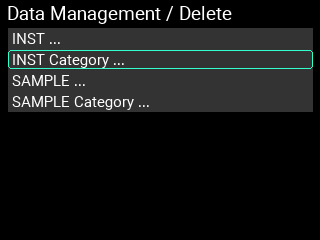
You can delete the INST and SAMPLE data that you’ve created. You can also delete the categories along with all data within those categories. However, you can’t delete the preset data.
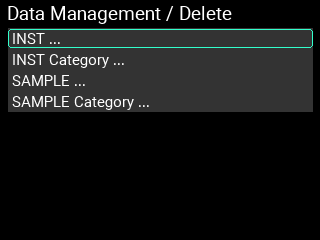
Deleting INSTs and SAMPLEs
In this example, we delete the INST called “Instrument 001”, which is in the “Root” category.
1 Select “INST ...” on the Data Management/Delete page, and press the ENTER button.

Tip: To delete the SAMPLE data, select “SAMPLE ...” here.
2 Select the file to delete.
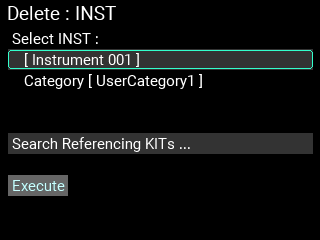
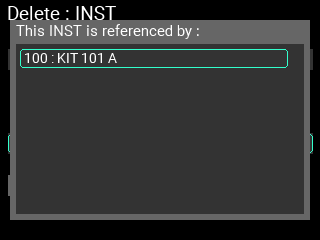
3 Move the cursor to “Search the Referencing KITs ...” and press the ENTER button to check the KIT or INST that’s used by the file that you want to delete.
4 Move the cursor to “Execute” and press the ENTER button. The following confirmation message is shown.
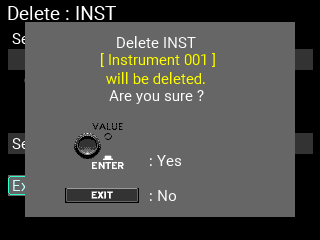
5 Press the ENTER button to finish deleting the file. When you delete a SAMPLE, the audio file saved in the MPS-10’s internal memory is also erased.
Note: Use caution, as you can’t recover a file once it’s been erased.
Note: When you delete an INST, [--OFF--] is assigned to the pads of the KIT that refers to that INST. Also, if you delete a SAMPLE, [--OFF--] is assigned to the block of the OSC that refers to that SAMPLE.
Deleting the categories and all the SAMPLEs/INSTs within the categories
In this example, we delete “UserCategory1” and all INST data in the category.
1 Select “INST Category ...” on the Data Management/Delete page, and press the ENTER button.
Tip: To delete the SAMPLE data within the category, select “SAMPLE Category ...” here.
2 Select the category to delete.
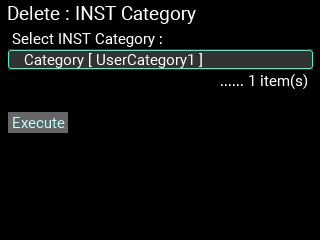
3 Move the cursor to “Execute” and press the ENTER button. The following confirmation message is shown.
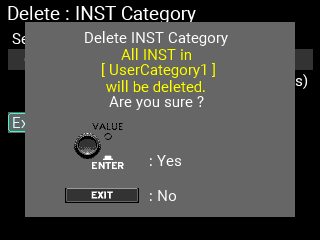
4 Press the ENTER button to finish deleting the category and files. When you delete a SAMPLE, the audio file saved in the MPS-10’s internal memory is also erased.
Note: Use caution, as you can’t recover a file once it’s been erased.
Note: When you delete an INST, [--OFF--] is assigned to the pads of the KIT that refers to that INST. Also, if you delete a SAMPLE, [--OFF--] is assigned to the block of the OSC that refers to that SAMPLE.
Note: When you try to delete the “Root” category, all files within the category are deleted but the “Root” category itself remains.
Here you can format a USB flash drive, restore the factory default settings and update the system.
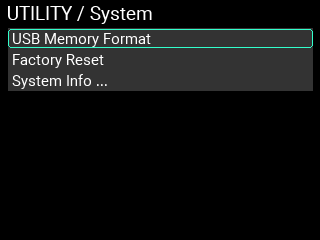
This formats (initializes) the USB flash drive.
1 Move the cursor to “USB Memory Format” and press the ENTER button.
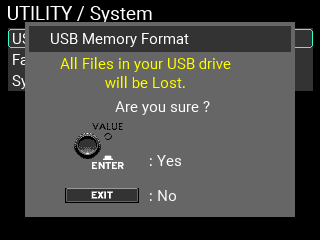
A message will display on the page to confirm the format procedure.
2 Press the ENTER button again to begin formatting. To cancel formatting, press the EXIT button.
Note: Make sure to format the USB flash drive on the MPS-10 before use.
Note: Formatting the USB flash drive will erase all its data. Back up any data on the flash drive that you wish to save by copying it to your computer or other device, before formatting the drive.
You can restore all of the MPS-10 settings to their factory-set default state.
1 Move the cursor to “Factory Reset” and press the ENTER button.
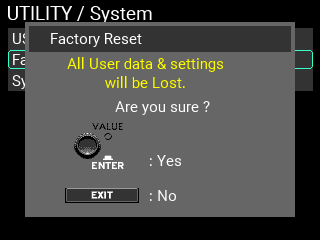
A message will display on the page to confirm the reset procedure.
2 Press the ENTER button again to restore the factory default settings.
To cancel the reset, press the EXIT button.
Note: This deletes any settings such as KITs, INSTs, SAMPLEs or system data as well as data you’ve recorded. The data cannot be recovered. Before you proceed, make sure that you want to erase the data and settings. Back up any data that you want to keep to a USB flash drive, such as user data, system data and so on.
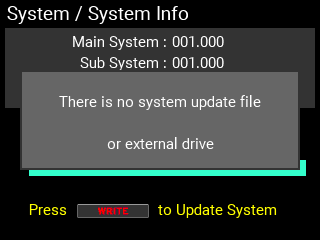
Checks the system version of the MPS-10. This is also used for updating the system.
Move the cursor to “System Info” and press the ENTER button.
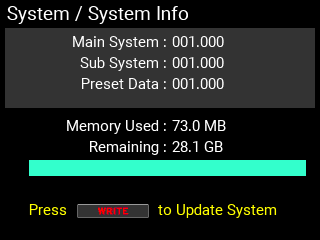
This lets you check the current system version and the internal memory available.
How to update the system
1 Begin by downloading the system file for updating to your computer, and copy that data to a USB flash drive.
Note: Make sure to save the system file to the root folder.
2 Connect the USB flash drive to the MPS-10. The System Info page appears.
3 Press the WRITE button.
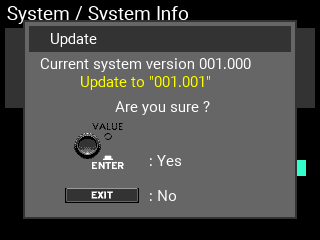
A message is shown on the page to confirm the update.
The update begins when you press the ENTER button, and a message is shown to confirm that the unit will turn off.
To cancel the update, press the EXIT button.
Note: If there is no system data for updating on the USB flash drive or if the USB flash drive is not inserted, the following message appears.
To save the UTILITY settings you’ve edited, you must write them.
Tip: The looper edit parameters are also UTILITY parameters, so you can save them as well by writing the utility parameters.
When you press the WRITE button on a page in UTILITY for which no message is shown, a message is shown for saving all the UTILITY settings to the MPS-10.

The settings you save here will be the default UTILITY settings the next time you turn on the power, so make sure to save them before turning off the power.
Tip: The data that’s saved includes Setup, LOOPER, SET LIST and Function Assign.
Tip: You can save the UTILITY settings even when Memory Protect is “ON”.