The MPS-10 features a four-track looper. With the looper, you can record the same sound that’s output from the MAIN OUT L (MONO), R jacks (what you play on the pads as well as the AUX IN/MIC IN input audio) for endless overdubbing.
While the looper is playing, you can use it to switch between KITs, for overdubbing sounds from different KITs or playing different KITs while the looper is playing back. Since it doesn’t matter which of the four tracks you record first, you can start recording from any track.
Note: The metronome can’t be recorded.
When you record tracks on the MPS-10 using the looper, this is called “Rec” mode.
To start Rec mode, set SW MODE to “LOOPER” on the top page in KIT mode.
In this mode, the track 1–4 buttons serve as track buttons. The LED colors indicate the current status of each track, with the LEDs of the empty track buttons lighting up dimly in white.
1 Press an empty track button.
For this example, let’s press the track 1 button. The LED for the button of the track you pressed and the REC button blink red, and the unit enters record standby.
Press the same track button to cancel record standby.
2 Strike a pad or press the REC button to start recording.
Strike the pads to play.
3 Once the first loop recording ends, the loop keeps playing and overdub recording begins.
The track 1 button lights up yellow at the same time as overdub recording begins.
Tip: You can set the length of the first loop to record from the LOOPER Setup page in Utility.
4 Next, keep playing to record.
5 To stop overdub recording, press the track 1 button during overdub recording, or press the REC button.
Track 1 keeps playing back in a loop.
6 Press the track 1 button again to stop playback.

Record track 2 in the same way as a loop.
7 When recording track 2, you can set the length of the track’s loop.
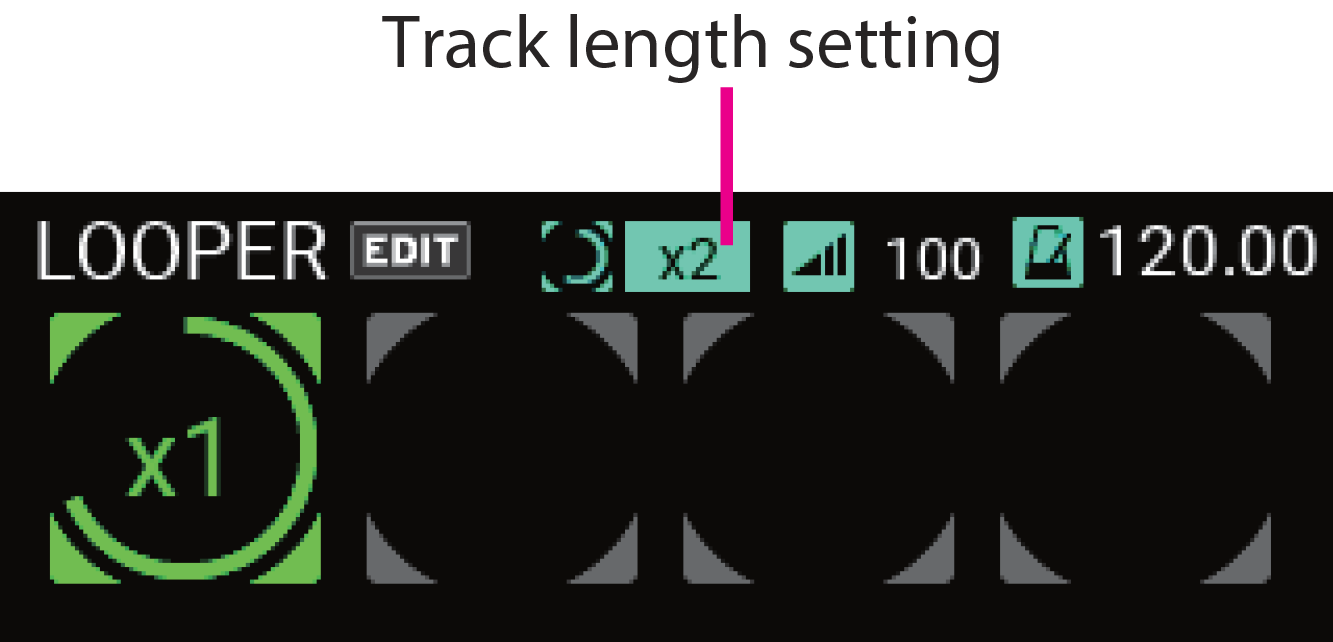
You can set the track length for loop recording as a multiple of track 1.
In this example, we use the “x2” setting to make the loop twice as long as track 1.
8 Record to track 2 using the same steps as you used for track 1.
On track 2, once you’ve recorded for twice the length of track 1, the unit switches to overdub mode.
Repeat these steps to record tracks 3 and 4.
Tip: The four tracks are set to “Sync” mode by default. Tracks that are set to “Sync” mode always begin in sync with each other when recorded or played back, and the track length is always either the same or a multiple integer of the first track that was recorded.
Refer to LOOPER edit menu for details.
If a track has already been recorded, the track length for tracks set to Sync mode is either the same or is a multiple integer of the first track that was recorded. You can decide on the multiple for the track length by setting it beforehand.
Once the specified recording length elapses after recording begins, the looper automatically switches to Overdub mode. However, you can press the track button while recording if you want to quit.
In this case, recording stops when you press the track button (the track button starts blinking) and after the beginning of the track has passed. The track length is set at this point, and the looper switches to Overdub mode.
How the BPM and Beat settings work
Each KIT can have its own BPM and Beat setting. The looper length is determined by the BPM and Beat setting of the currently selected KIT.
However, by enabling Free Length on the LOOPER Setup page, you can set the looper length when the first track finishes recording, without having to set it beforehand.
You can change the BPM of the looper as you like when all tracks are empty. When you switch KITs in this state, the BPM setting of the KIT you switched to is also applied to the looper. (In the same way, the BPM for the KIT is also applied to the metronome.)
The timing settings are only loaded when you switch to a different KIT, so you can also change just the BPM for the looper.
However, once you record to a track, the looper BPM is fixed and does not follow any changes in KITs or metronome tempo.
The metronome BPM follows that of the KIT, but the metronome tempo follows the looper right when the looper begins recording. This tempo is maintained until you switch to a different KIT or change the tempo using the METRONOME knob.
When the looper is being used, the top page in KIT mode is divided into two sections (upper and lower). The KIT is shown above, and the looper information is shown below.
To change the track length and level from the top page, move the cursor with the VALUE knob and press the ENTER button to select.
You can change the parameters by turning the VALUE knob while it’s selected.
The four circles shown on the “LOOPER” side indicate the status of the four looper tracks.
| Empty tracks are shown in gray. |
| Tracks that are stopped are indicated by text inside the gray circles, which shows the track length. |
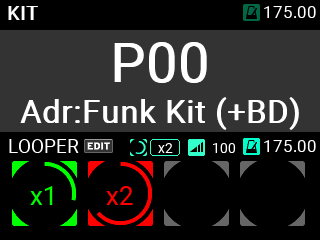
| Tracks shown in red are now recording. |
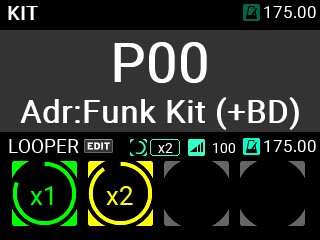
| Tracks shown in yellow are now overdubbing. |
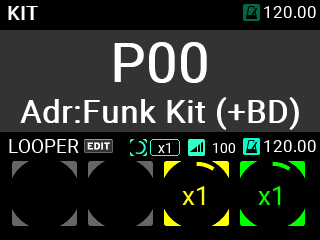
| Tracks shown in green are now playing. |


For tracks in Play or Overdub mode, the green or yellow line inside the circle gets longer as the track cycles.
Also, if the looper length has already been set in Rec mode, the red line inside the circle indicates the looper length. Otherwise, “Rec” is shown in red letters.
The track length is shown at the center of each circle.
From the top page, you can set the length of all tracks that are in Sync mode.
When “Free” is shown, this means that the multiple for the track length has not been set beforehand.
With this setting, the track returns to the beginning after you finish recording, the recording stops and then the track length is set.
Tip: The factory default setting is “x1”.
While overdubbing
The REC button stays lit during overdubbing as well, and the track button lights up yellow.
When you press the track button for a track that’s overdubbing, overdubbing stops, the track returns to Play mode and the LED changes from yellow to green.
Playing
The track buttons for tracks that are now playing light up green. When you press the track button for a track that’s playing, the track stops and the LED changes to dark green.
While stopped
The track buttons for tracks that are stopped light up dark green.
When you press the track button for a track that’s stopped, the track starts and the LED changes from dark green to green.
If there are no tracks already playing at this time, playback starts from the beginning of the track.
If a track is already playing (for example, track 1) and another track whose button you pressed (for example, track 2) is in Sync mode, track 2’s play position synchronizes with track 1, and track 2 starts playing back from that point.
If the track whose button you pressed is in Free mode, that track will start playing from the beginning, without reference to the current playback position.
The looper tracks feature two modes, Loop mode and One Shot mode.
Loop mode
Loop mode includes two settings, “Sync” and “Free”.
With the “Free” setting, the track always starts from the beginning regardless of the state of the other tracks or the BPM, and its length is set when recording stops. Also, the track plays back from the beginning when you press the track button, regardless of the state of the other tracks.
The length of the track when set to “Free” is not affected by other tracks, and it can be played back and stopped separately from the other tracks.
For tracks set to “Sync”, the track length is the loop length that you initially set, and you can synchronize multiple tracks for recording/playback.
Even if you set the loop length to a value other than “x1” and create a loop track whose length differs from the first track you recorded, the “Sync” setting lets you play back and record tracks in time with the other tracks.
If you start recording with a track set to “Sync” while other tracks are playing, the recording starts in sync with the track or tracks that are now playing, not from the beginning of the track. Also, the start of playback is synchronized with the track that’s playing back, and all tracks set to “Sync” play through the beginning at the same time without getting out of sync.
Tip: All four tracks are set to “Sync” by default.
One Shot mode
Tracks set to One Shot mode start recording or playback in the same way as with the “Free” setting, but they stop when recording is stopped. When playing back, these tracks do not loop, but instead play back just once before stopping. If you press the track’s button while it is playing back, playback stops.
Refer to LOOPER edit menu for details on the various settings.
You can use an external audio signal input or play a pad to trigger the start of recording, and you can strike a specified pad to stop recording. You can also set a foot switch to trigger the start of recording.
With the default settings, when you press the track button for a track that’s recording, recording stops, the track switches to Overdub mode and the LED changes from red to yellow.
The unit operates as follows when you record with all tracks empty.
• Setting the track length ahead of time
If the Free Length setting is disabled, overdubbing begins automatically once you’ve recorded up to the predetermined length.
• Leaving the track length undecided
If the Free Length setting is enabled, the track length is determined once you press the track button, and then overdubbing begins.
After that, this track length is used as the base until all tracks are empty, and the BPM of the looper is shown as the value calculated from this track length.
The ERASE button on the control panel is used for erasing the contents of a track or for switching to Erase Rec mode. The button works differently depending on the looper state.
Erasing while the looper is playing back or stopped
When you press the ERASE button, the LED on the button blinks.
Press a track button in this state to erase the contents of that track.
The buttons of the erased tracks light up dimly in white, and the ERASE button goes dark, returning to its normal state.
Erasing during recording
When you press the ERASE button while recording, the recording is instantly canceled and the track contents are erased.
Erasing during overdubbing
When you press the ERASE button while overdubbing, the contents of everything you’ve recorded as an overdub thus far are erased, and the track returns to how it was before you started overdubbing. The unit remains in Overdub mode even after you erase data in this way.
Erase Rec
Similar to punch-in or replacing parts of a track, Erase Rec lets you record new parts to a track while recording over the existing data.
When you press the REC button while Erase Rec (UTILITY - LOOPER Setup) is “ON”, the REC and ERASE buttons blink, and the unit enters Erase Rec standby mode.
Tip: You can also press both the REC and ERASE buttons at the same time to enter Standby mode.
At this time, when you press the button for a track that’s already recorded, Erase Rec starts instead of Overdub.
The operations you use to start and end recording, as well as the actions afterwards are the same as Overdub mode. However, while Overdub mode lets you overlay what you play on the existing tracks, Erase Rec erases over the recorded data as you’re recording new data.
This method of replacing what you’ve recorded is similar to punching in and out on an MTR (multitrack recorder).
Once you pass through the track with Erase Rec and return to the point where you started recording, the ERASE button goes dark and the unit switches to Overdub mode.
The looper features a dedicated built-in effects section for the output. You can turn this on or off at any time by pressing the button on the control panel.
Refer to LOOPER edit menu for details on the effect settings.